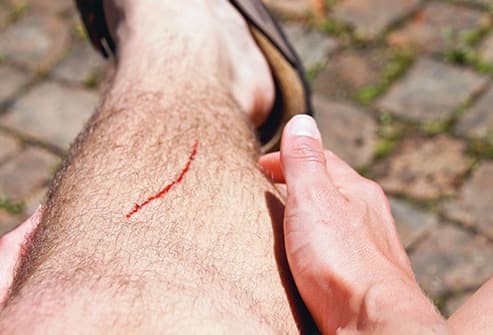
You can take care of most minor cuts and scrapes yourself. How can you tell you don’t need medical help? Home treatment is OK if the wound isn’t very deep and it’s not in a spot where scarring is a problem, like your face. You can also treat it on your own if you can stop the bleeding in 10 minutes with gentle pressure. And make sure there isn’t any dirt in the wound and you’ve had a tetanus shot in the last 10 years.
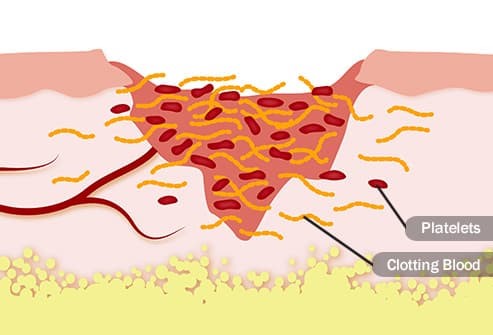
STAGE 1: THE BLEEDING STOPS
In the first of four healing stages, your body swings into action to stop the flow of blood. Your blood vessel walls narrow to let less of the red stuff through. In minutes, blood cells called platelets rush to the site. Proteins in your blood act like glue to make the platelets clump together and stick to the opening in the blood vessel. This forms a clot, which plugs the bleeding.

STAGE 2: THE INFLAMATION BEGINS
Your blood platelets release special chemicals that cause inflammation. You might see some swelling and redness around the wound. White blood cells head to the scene. They clear the injured area of bacteria and other germs to keep it from getting infected. Your white blood cells also make chemicals called growth factors that help repair the injured area.
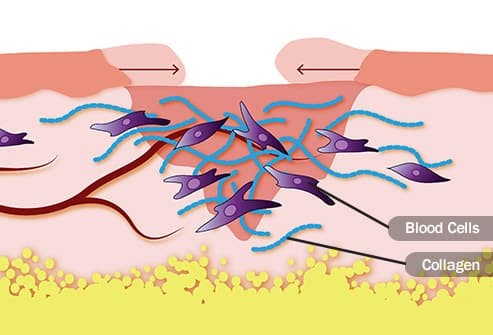
STAGE 3: SKIN REBUILDS
Now your body’s healing process kicks into gear. Blood cells arrive to start building new skin. They give your wound the oxygen and nutrients it needs to heal and grow new blood vessels. Chemical messengers direct cells to make collagen, a protein that acts like scaffolding to rebuild the damaged area. You might see a scar, which starts out red but should fade with time.
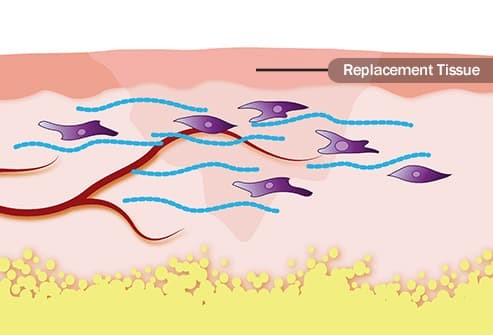
STAGE 4: THE HOME STRETCH
All the things you need to rebuild your skin are now in place. The last stage of healing is about making the new skin stronger. You might see some stretching or puckering around the wound as the replacement tissue takes hold. Total healing can take days, months, or even years. Once the damage has been fully repaired, your skin should be about as strong as it was before the injury.
Wound Care Step 1: Apply Pressure
Before you do anything, wash your hands with soap and water. Then the first step is to stop the bleeding. Put gentle pressure on your skin with a gauze pad or clean cloth. If blood soaks through the gauze, add another piece on top. Raise the injured area if you can to slow the flow of blood. Keep up the pressure for a few minutes.
Wound Care Step 2: Rinse Well
Next, clean out any dirt and debris in your wound to prevent infection. Rinse the cut under running water, or pour a cup of clear water over it. You can also use an alcohol-free wipe or sterile gauze pad moistened with water. Don’t use an antiseptic to wash the injury, because it could irritate your skin.
Wound Care Step 3: Wash Around It
Put a little bit of soap on a washcloth and wash around the injured spot. Try not to get soap on the wound. Don’t use hydrogen peroxide or iodine, because it could irritate skin that’s already damaged. Afterward, gently pat the area dry with a clean towel or tissues. Don’t use a cotton ball, because pieces of it could get stuck in the wound.
Wound Care Step 4: Remove Debris
If you still see dirt in the cut after you’ve washed it, use tweezers cleaned with rubbing alcohol to gently pick it out. You can also use tweezers to remove any glass, gravel, or other things left inside the wound. If you can’t get everything out, see your doctor.
Wound Care Step 5: Use Exquis Wound Healing Cream
EXQUIS® Wound Healing Cream is an advanced silicone treatment for minimizing the appearance of scars. The cream dries rapidly to form an invisible protective liquid bandage over the affected area. This protective barrier is flexible, waterproof, and breathable. The patent pending liposome dermal delivery technology has lipid composition similar to the skin. This helps the wound to heal faster. The silicones in the formulation have been shown to flatten, soften, and smooth scars, relieve the itching and discomfort of scars, as well as reduce the discoloration associated with scars.
The product is intended for the management of old and new hypertrophic or keloid scarring resulting from burns, general surgical procedures or trauma wounds
Wound Care Step 6: Bandage
You don’t have to cover small cuts and scrapes. But if your wound is in a spot that rubs against your clothes or may get dirty — like on your knee or hand — put on a gauze pad or a sterile bandage. A bandage keeps the area moist, which helps prevent scabs and scars. The dressing will also keep bacteria out and prevent infection. For deeper cuts, use a “butterfly” bandage to hold the skin closed.
Wound Care Step 7: Change Bandages
Put on a new one at least once a day to keep the wound clean. And replace it if the old bandage gets wet or dirty.
Wash your hands before you change the dressing. Try not to touch the wound. You can apply another layer of antibiotic ointment before you put on the new bandage.
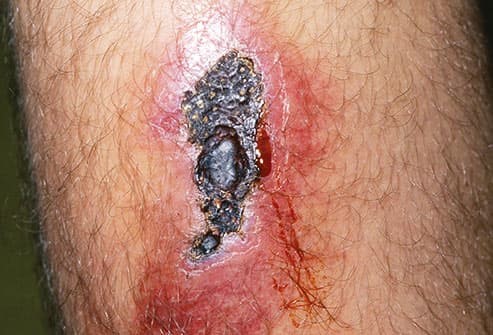
Watch Out For Infection
Any opening in the skin can get infected. As your wound heals, look out for these signs, and check with your doctor if you have:
- Redness and swelling
- A lot of pain near the wound
- Thick, grayish fluid draining from it
- A fever higher than 100.4 F
- Red streaks near the cut
For more information
Visit https://www.ExquisSkincare.com/X/